Over the years my home network has been powered by Ubiquiti hardware - nano HD APs, an in-wall AP, a Flex AP, an Outdoor Mesh, network switch, and a USG. For the most part I’ve been very happy with the hardware, but I’ve had issues with the USG a few times.
There have been occasions where upgrading the USG lead it to stop working, either requiring a factory reset and re-import of settings, or needing to rebuild the internal database. Though I was able to ssh into the USG and rebuild the database, it was always a pain. I often wouldn’t know there was an issue until one of my kids complained about the internet not working. Also, there were times where I felt the USG was underpowered, and restricted the total bandwidth I was able to achieve in the house.
What to choose?
I’d put off doing anything about it for probably a year or more. Yeah I know, the typical guy in IT putting off doing anything about their own environment! In late 2022 I finally began looking at options for a replacement, both from Ubiquiti and other alternatives that would still work with the existing APs I have. I happened to be talking about it with a friend and colleague, Rami, who lives and breathes infrastructure and networking, and he suggested I look into OPNsense.
I vaguely recalled having heard of OPNsense, pfsense, and similar firewalls over the years but hadn’t delved deep their capabilities or how to set them up. Rami admitted there is more up front config required with OPNsense than an off the shelf solution, but it provided a great deal more control over how it worked as well.
What about the hardware?
As OPNsense is a piece of software, it still needs hardware to run on. While chatting about it with Rami, he suggested I look at the ODROID-H3+. I was using a small Raspberry Pi device to run pihole, but it was pre-assembled and I’d never really done any device building before.
After reading through the details of the ODROID-H3+, most of the work was already done and it was just putting pieces together, which I could totally do! Here is the list of components I purchased from HARDKERNEL:
-
1 x ODROID-H3+
-
2 x 16GB DDR4 memory
-
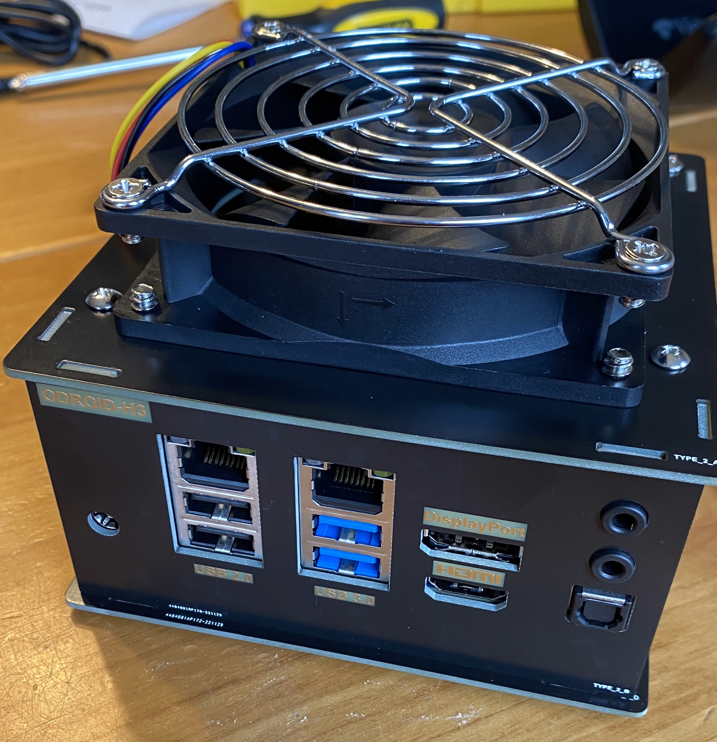
1 x Fan
-
1 x Type 2 case
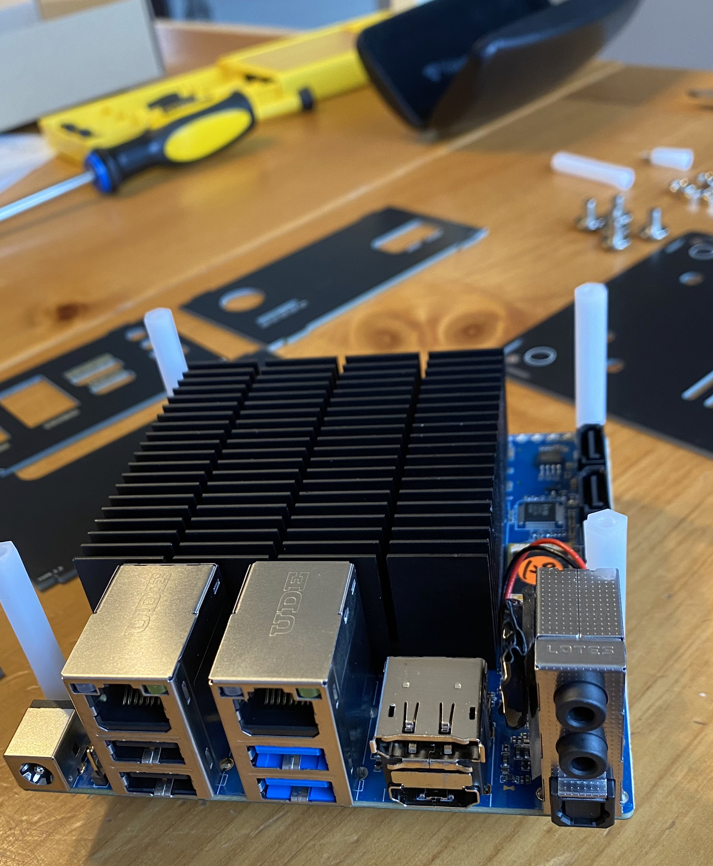
Once everything had arrived, it was construction time! Above is a photo of all the components laid out ready to be put together. The hardest part of the construction was getting the pieces of the case in the right position so they all connected correctly at the end! It took a couple of attempts to get that sorted, but then it came together nicely into the completed unit seen below.
OPNsense installation
With the hardware ready, now it was time to install OPNsense and get it running. After loading the OPNsense installation onto a USB stick, I used the dvd installation type, I plugged it in and booted up the device.
I chose to install FreeBSD with the ZFS file system to have journaling enabled. I don’t know whether it’s necessary, but seemed like a logical approach. When the installation of the operating system had completed, it was unable to find any network interfaces. At this point I was questioning whether I had made the correct decision to build a firewall myself as opposed to buying a pre-packaged solution!
As the ODROID-H3+ uses a Realtek RTL8125B network card, FreeBSD was unable to recognize it. Luckily I found reference to the problem on a blog, with handy information on how to resolve it.
I first ran pciconf -vl to verify the network cards were present but the driver was none.
Then I found a driver package for the network card from FreshPorts,
which I downloaded and put onto another USB.
Here are the steps I took to install the network driver:
-
mkdir /mnt/usbstick -
ls -l /dev/da* -
mount -t msdosfs /dev/da1p2 /mnt/usbstick-
da1is the USB stick, andp2was the first partition
-
-
pkg add /mnt/usbstick/realtek-re-kmod-v196.04.txz-
At the time I installed the driver it was
v196
-
-
umount /mnt/usbstickandrm -rf /mnt/usbstick-
Unmount the USB stick and remove the directory created for it
-
To load the driver into the operating system we need to edit /boot/loader.conf.local and add the following:
if_re_load="YES"
if_re_name="/boot/modules/if_re.ko"
With the change in place, reboot the device.
Once booted, run kldstat to ensure that if_re.ko is loaded successfully.
Lastly, run ifconfig -a to verify the NIC is now present.
With the network card now detected, we can assign the interfaces with OPNsense.
In my case, I assigned re0 as the WAN (the internet), and re1 as the LAN (internal network).
Then set the IP address for the LAN and it’s respective IP range,
which can be customized to your preferences.
One possible choice is an IP address of 192.168.0.1 for the LAN, and a range from 192.168.0.3 to 192.168.0.255.
OPNsense set up
A neat trick that Rami told me was to set up the firewall inside your network! Doing this means not interrupting the existing internet in your house until you’re ready, which is critical when you have kids that can’t live without internet, and it doesn’t expose an unsecured and un-configured firewall to potential attack. In this set up, the WAN of the device connects to your main internal network to get its internet.
To be able to access the OPNsense UI from your main home network,
as it’s on the WAN side of the firewall, we need to run pfctl -d after every reboot to disable the firewall.
As the device isn’t performing any protection for us yet, there’s no issue in disabling the firewall while we finish the set up.
I also installed Tailscale by following these instructions.
There are a couple of key things you want to verify in the UI before continuing much further. Go to System → Settings → Administration and verify the following:
-
HTTPS enabled for web protocol
-
HTTP Strict Transport Security enabled
-
Disable DNS Rebinding Checks is unchecked
I then created an administrator account and disabled the root user, by following these instructions, to increase security. I also enabled multi-factor authentication for the administrator account, based on this.
To finish the set up of Tailscale, head to Interfaces → Assignments in the UI. There should already be an interface named tailscale in the New Interface section, click on the plus icon. We need to enable the interface, and also prevent it from being removed. Give the interface a name, set the IPv4 config to static, and set the IPv4 address to the one from Tailscale.
Next I set up the VLANs.
I wanted a separate VLAN for any server or device, another for personal computers and phones, another for work devices, and another for IoT devices.
When creating the interface for a VLAN change the IP address to have /24, as /32 is the default.
If the default remains, it won’t think there are any IP addresses available for use.
When all your desired VLANs have been created,
head to Services → DHCPv4 in the UI and for each VLAN enable DHCP and set the desired IP range.
By default, access to the internet is disallowed from all VLANs, and all VLANs can communicate with each other and the parent, which is the main LAN. In the UI, go to Firewalls → Rules. For each interface name, set your preferred firewall rules. In my case, I allowed all VLANs to access the internet, but disallowed the IoT VLAN from talking with any other VLAN.
That’s the basic set up for the OPNsense firewall. With all the above done, I took the next step and replaced the existing USG device with the new firewall!
OPNsense and Bonjour printer
As all things do, it worked, to an extent. All usual devices worked as expected with the new firewall, but there were a few exceptions that needed to be handled. The first of which was the printer.
To enable printers to use the Bonjour protocol to communicate, we need to install an mDNS repeater into OPNsense. You may ask why I want to use Bonjour for printer communication, we have several iPhones and Macs in the house, which makes it just easier if we do.
The instructions for setting up mDNS with OPNsense are covered here in detail. First step is to install the plugin through the UI. Once the plugin is installed, enable the service and select which network VLANs should be enabled. In my case, I enabled it for the main LAN and the VLAN where all our personal devices are connected, including the printer itself.
OPNsense and a Nintendo Switch
There was still one device that was having trouble connecting to online play, my son’s Nintendo Switch! Looking at the internet settings of the Nintendo Switch, it was showing a NAT type of D when at least a C is recommended for best online play.
I found a great resource explaining what was needed to improve it! Under Services → DHCPv4, find the VLAN which the Nintendo Switch is connecting to and add a new static DHCP mapping rule with the MAC and IP of the Nintendo Switch. Then in Firewall → NAT → Outbound, change Automatic to Hybrid and save the changes. Next, create a new rule with the following properties:
-
Set Interface to WAN
-
Set it to use IPv4
-
Set Protocol to any
-
For Source address, select Single host or Network and set the IP Address to that of the Nintendo Switch with
/32 -
Set Destination address to any
-
Set Static-port to enabled
A year of experiences
After having used OPNsense for a year now, and performed many minor and several major upgrades in that time, I am impressed with how well the software performs and how smooth the upgrades are. There have been several times where I’ve needed to customize specific configuration for various reasons, but once I got the hang of the UI and how things are set up, I’ve found it very easy to navigate.
There was definitely a learning curve, especially in resolving the issues around network cards not being found, etc. But I feel the experience was a great learning one, and worth it in the long run.